
Practical checklist on how to prepare a commercial building for an air tightness test for UK businesses
Preparing a commercial building for an air tightness test is essential if you want to achieve a first‑time pass and avoid costly delays. Whether you’re working on a warehouse, office, retail unit, school, or industrial facility, proper preparation ensures your building meets the requirements of Approved Document L (Part L) and performs efficiently once occupied.
This guide provides a practical, step‑by‑step checklist to help UK businesses prepare their commercial buildings for a successful air tightness test — with links to our in‑depth blogs and service pages for further guidance.
Why Preparation Matters for a Commercial Air Tightness Test
Air tightness testing measures how much air escapes through gaps, cracks, and penetrations in the building envelope. Poor preparation leads to:
- Failed tests
- Retesting costs
- Delays in Building Control sign‑off
- Increased energy consumption
- Poor EPC ratings
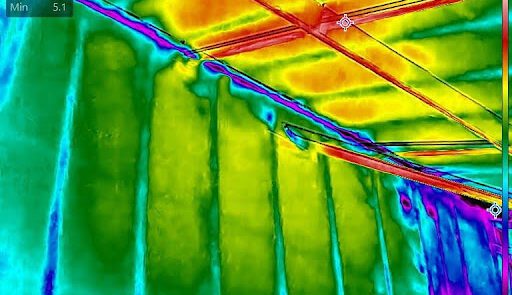
To understand how leakage paths form, see our knowledge article:
👉 Air Leakage Paths Found During Thermal Imaging Surveys

Step‑by‑Step Checklist for Preparing a Commercial Building for air testing
Below is a practical checklist designed specifically for commercial buildings.
1. Ensure the Building Envelope Is Complete
Before testing, the building must be as close to finished as possible. This includes:
- All external doors and windows installed
- Cladding and façade systems complete
- Roof and wall junctions sealed
- Service penetrations closed and sealed
For examples of common leakage points, see:
👉 Common Air Leakage Paths Identified During Air Tightness Testing
2. Seal All Service Penetrations
Commercial buildings often contain hundreds of penetrations for:
- Electrical cables
- HVAC ductwork
- Plumbing
- Fire stopping
- Data cabling
Every penetration must be sealed with appropriate materials. Unsealed penetrations are one of the most common causes of test failures.
Learn more about identifying leakage paths here:
👉 Air Leakage Paths Found During Thermal Imaging Surveys
3. Close All Ventilation Systems and Dampers
Before the test:
- Turn off mechanical ventilation
- Close all dampers
- Seal open ductwork
- Ensure trickle vents are closed
If ventilation systems remain open, the building will fail.
4. Check External Doors and Shutters
Commercial buildings often have:
- Roller shutter doors
- Fire exits
- Loading bay doors
These are major leakage points. Ensure:
- Door seals are installed
- Thresholds are sealed
- Shutters close tightly
For more guidance, see:
👉 Smoke Leakage Surveys to Pass Air Tightness Testing
5. Inspect Internal Areas for Air Leakage Paths
Internal leakage can occur around:
- Lift shafts
- Risers
- Stairwells
- Suspended ceilings
- Plant rooms
These areas often connect directly to the outside envelope.
If you suspect hidden leakage, smoke testing can help:
👉 Smoke Testing Service to find air leakage paths
6. Ensure All Wet Trades Are Complete
Wet trades such as plastering, screeding, and sealing must be finished and dry. Wet materials can affect pressure readings and cause inaccurate results.
7. Prepare the Building for Pressurisation
On the day of the test:
- Turn off heating and cooling systems
- Close all internal doors
- Ensure all personnel are aware of the test
- Provide clear access to the main entrance for blower door setup
For a full breakdown of the testing process, see:
👉 Our Air Tightness Testing Procedure
What Happens If the Building Fails the Part L Air Tightness Test?
If your commercial building fails the air tightness test:
- It cannot be signed off by Building Control
- Remedial sealing work is required
- Retesting may be necessary
- Project delays and additional costs may occur
APT Sound Testing can provide on‑site diagnostics, including smoke tracing and thermal imaging, to quickly locate and fix leakage paths.
Explore our diagnostic services:
👉 Thermal Imaging Surveys
👉 Smoke Testing for AOV Smoke Shafts
Why Proper Preparation Saves Time and Money
A well‑prepared building:
- Passes first time
- Avoids costly delays
- Reduces energy bills
- Improves EPC ratings
- Ensures Part L compliance
- Enhances long‑term building performance
How APT Sound Testing Helps Commercial Clients
APT Sound Testing provides:
- UKAS‑accredited commercial air tightness testing
- ATTMA Level 2 certified engineers
- High‑capacity, UKAS‑calibrated blower door systems
- Smoke leakage diagnostics
- Thermal imaging surveys
- Pre‑test inspections
- Nationwide coverage
Explore our full service offering:
👉 Air Tightness Testing Services
📞 Contact Us Now
APT Sound Testing is a UKAS‑accredited testing laboratory and an ATTMA Level 2 certified air‑tightness testing provider, giving you complete confidence that your commercial building will be tested to the highest industry standards.
We use the latest modular, UKAS‑calibrated blower door systems, capable of testing everything from small commercial units to large warehouses and complex multi‑storey buildings. Our advanced diagnostic tools — including smoke tracing and thermal imaging — ensure fast, accurate identification of air leakage paths so your project passes first time.
👉 Contact us today at info@aptsoundtesting.co.uk or call Darren on 077775623464 to book your commercial air tightness test and ensure full compliance with UK Building Regulations.